
In my last artucle, I showed you that an end user could join a Windows client to Active Directory Domain Services (AD DS) or to Entra ID, but not both. In this article we will install and configure Entra Connect so that we can join our devices to both, so that we can offer the maturity of the on-prem environment (such as existing Group Policy, Configuration Manager,, etc…) with the modern advantages of the cloud… and how our users can use a single set of credentials for both their on-prem and many of their cloud resources..
While the on-prem resources (and therefore IAM) are still vital to many businesses, so too is the cloud. The importance of limiting the number of credentials our users must maintain is great not only for them being able to remember their passwords, but for also for our organizational information security.
In order to bridge the two, we are going to use a tool called Entra Connect. For this we are going to create a machine running a supported edition of Windows Server. When I wrote my original article on the process I was using WIndows Server 2019; today I am using Windows Server 2025… despite some issues I have had with it in the past. It must be domain joined, While earlier versions may work, the recommendation is .NET v. 4.8 or later.
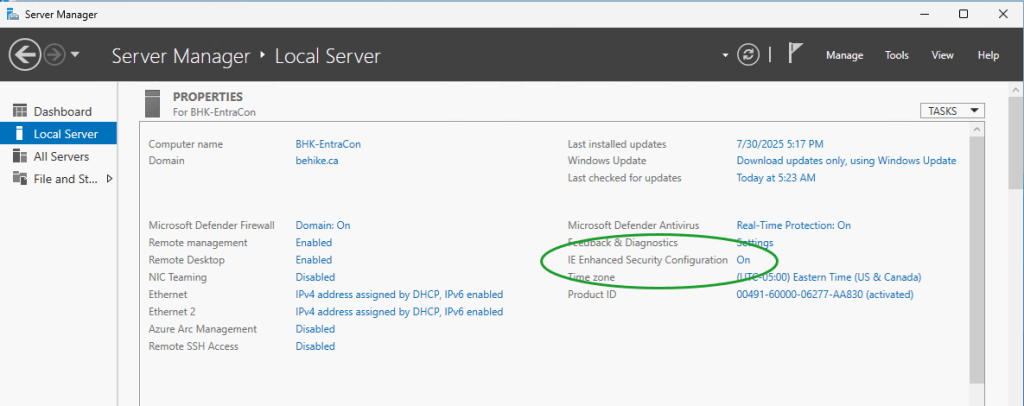
Before we even download the tool, we are going to take care of one pesky item… we have to disable the IE Enhanced Security Configuration on the server, In your Server Manager dashboard click on Configure this local server. In the right column you should see the option… click on the word On and turn it off (for both Users and Administrators).
Entra Connect is downloaded from your Microsoft Entra admin centre. When logged into the portal: in the navigation pane expand Entra ID then scroll to Entra Connect. In the main screen click the Manage tab, Under Manage from on-premises: Connect Sync click the button Download Connect Sync Tool.
**NOTE: There is an option to manage Cloud Sync from the cloud. This will not be covered in this article.
While AzureAD was renamed Entra ID in August 2023, and while the tool is now called Entra Connect, the downloaded file is still called AzureAdConnect.msi. Run the installer and make sure it installs completely. (I clicked install, accepted the UAC warning, and then walked away for two minutes. When I came back, I noticed there was a new UAC window on my screen; before I could click anything it ended the installation prematurely. My bad… don’t walk away, it’s a really quick install.)
To confirure Entra Connect Sync you will need:
- A domain account that is a member of the Enterprise Admins group; and
- An Entra ID account that is a member of the Hybrid Identity Administrators role.
Run the program (the icon on your desktop also still says Azure AD Connect).
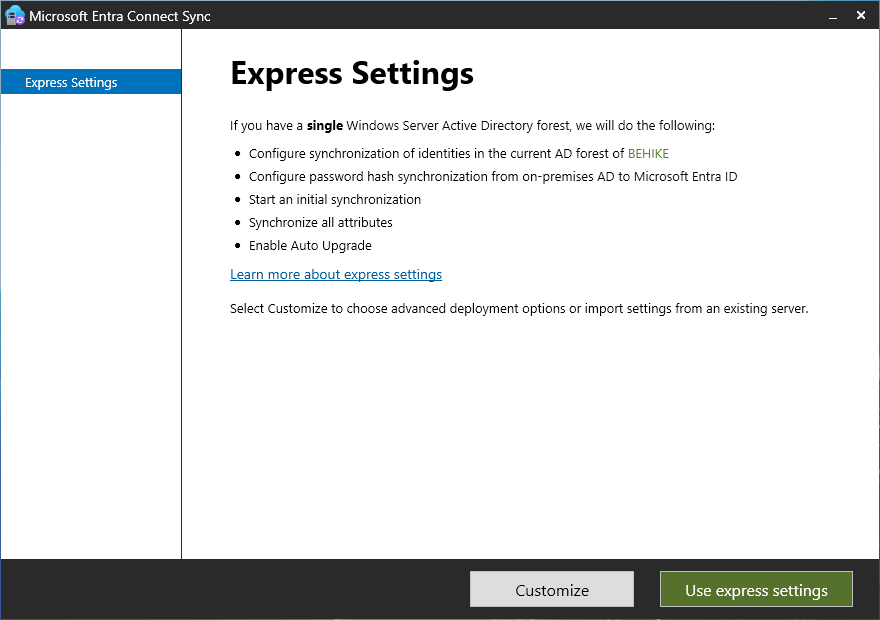
If you have a simple AD domain then the Express Settings will probably be simpler. On the Express Settings page you can click Use express settings… or you can click Customize. My domain is pretty simple so for the article we are going to use the express settings… even though I know there is an issue I will have to fix when we’re done.
On the Connect to Microsoft Entra ID screen you need to enter the cloud credentials of a user in the Hybrid Identity Administrator role and then click Next.
On the Connect to AD DS screen you need to enter the domain credentials of a user in the Enterprise Administrators group.
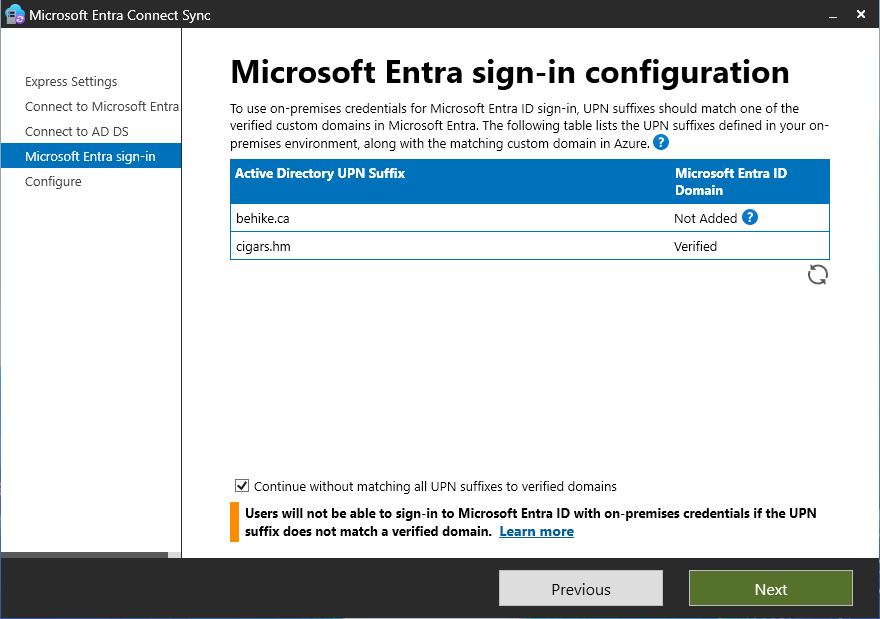
The next screen will be the Microsoft Entra sign-in configuration screen. If you are using a different domain name on prem as you are in the cloud then you will have to be careful here. I know, for example, that while my internal domain name is Behike.ca, I use that name in a different tenant that is not connected to my main Entra tenant… rather than taking that all apart, I decided to map my online users to a diffent domain name. In order to do that, without having to go back and reconfigure things manually, I decided first to add that UPN (User Principal Name) to my Active Directory, using the following PowerShell cmdlet:
Get-ADForest | Set-ADForest -UPNSuffixes @{add=”cigars.hm”}
In any event, on this screen you will click Continue without matching… if you have a conflicting name (as I do)…
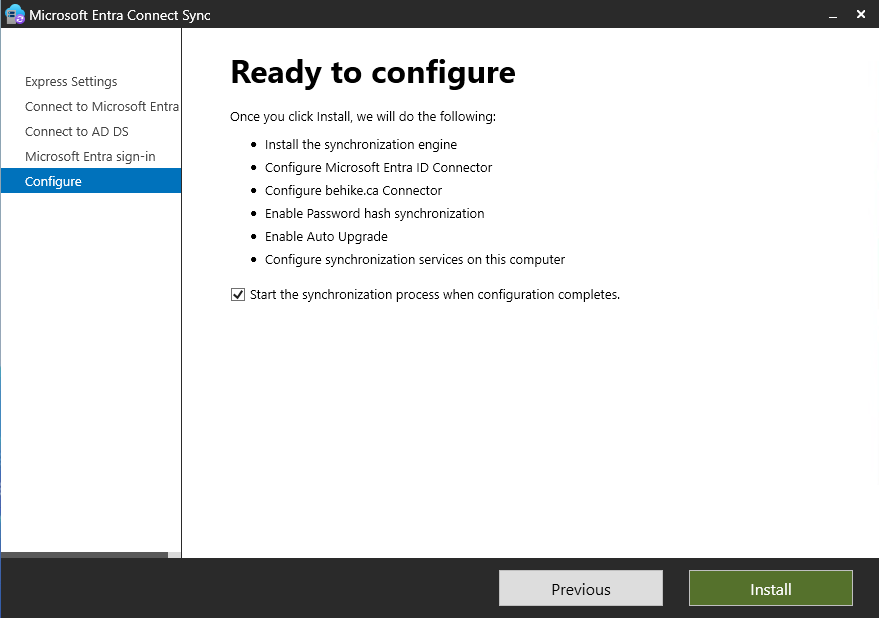
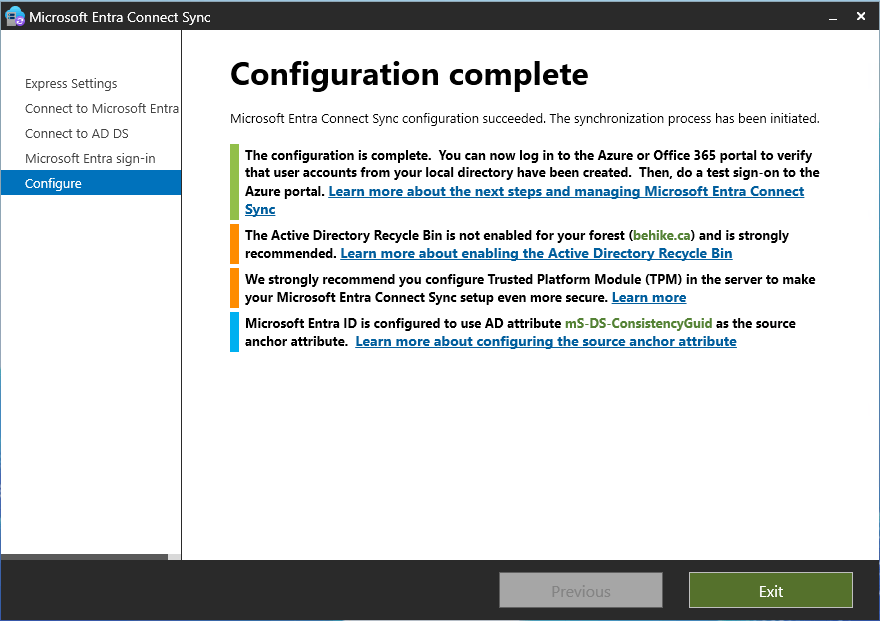
Once you get past here, the next screen will be Ready to configure. You will notice at the bottom of the list of what it is going to do, there is a checkbox that by default is checked that says Start the synchronization process when configuration completes. You can unselect it if you’d like, but I usually do not. Click install… and away we go!
On the final screen (and yes, it will take a few minutes) it will give you any tips to improve your environment. You will see in mine that I have not enabled the AD Recycle Bin, which I will do quickly.
It is going to take a few minutes (or longer) for the synchronization to complete, but once it does you might still need to do some tweaking. The most common issue I come across is that users who should be mitchg@cigars.hm turn out to be mitchg@garvis.onmicrosoft.com… that can be caused by any number of minor issues, and while they are all pretty simple fixes, many of them are pretty technical and that is not the topic of this article.
I can check in my Entra tenant that my on-premises synced objects were created… which I did by creating a filter for On-premises syn enabled == Yes. Voila!

Conclusion
In this article we installed the Entra Connect tool, and configured it for a simple sync that connects our local AD DS domain to our cloud Entra tenant.
In my next article, I will walk you through the process of configuring your environment so that your workstations are both Active Directory joined and Entra ID joined. Stay tuned!

Leave a comment