

“IT should not be a religion, it should be about selecting the right tools for the job.”
The first time I said those words I was on a Microsoft stage, wearing a Microsoft logoed shirt, speaking to a Microsoft audience. I remember seeing the event sponsor – a Product Manager at Microsoft Canada – turn shades of red. How dare I stand on a Microsoft stage speaking to a Microsoft audience and imply that in some cases there were better options than those offered by Microsoft?
I was relieved when he and I spoke later and I was able to explain to him why I said it… and I convinced him that I was right. We continued to work together on many different events after that. It could have gone another way.
I have used Microsoft Windows as my main desktop operating system for the last three decades. I have been implementing Windows Server for nearly as long, and I have been consulting on both of them since before the millennium started. I cannot imagine what would have to happen for me to decide one day that Windows would no longer be my primary operating system. I am not saying it couldn’t happen… but it is unlikely to happen any time soon.
Here’s the thing… while I still see Windows as the best tool for the job for desktop productivity, when it comes to cybersecurity it is a Linux world. Sure, you can download some of the tools we use for cyber in Windows, but there is no contest – to be a cybersecurity professional you need to know and use Linux.
A couple of years ago I wrote a series of three articles on installing Kali Linux on Windows Subsystem for Linux (WSL). Kali Linux is a penetration testing and security-focused distribution that is based on the Debian kernel. While some may prefer Parrot Linux for the purpose, and believe me I understand, Kali remains an industry standard. Additionally, Kali is available in WSL where Parrot is not.
I have been telling my students for years that if you are going to work in cybersecurity, you need to learn Linux… and I have championed the use of Kali to them for just as long. I even wrote a couple of articles to guide my students in installing virtual machines running Kali on their desktop computers (See Windows 11/10 Hyper-V and Oracle VirtualBox articles). I also wrote later that year a series of three articles on installing Kali in WSL… including the full experience and Remote Desktop.
After teaching a class on Linux recently, I decided it was time to revisit WSL.
I have been a Windows Hyper-V advocate since before it was called Hyper-V. However, the ability to completely and seamlessly integrate the Linux environment into our Windows desktop certainly has its advantages. It requires fewer resources (and no resource dedication), it starts up much quicker, and it seamlessly integrates to the desktop (including mounting the local file system as /mnt/c). Additionally, by using WSL it is easier to mount several different builds of Linux in the desktop.
Step 1: Enable Windows Subsystem for Linux
Installing WSL is a pretty simple process. Because it is a part of the Windows it really just has to be turned on. Open a PowerShell window (as Administrator) and run the following cmdlet:
Enable-WindowsOptionalFeature –Online –FeatureName Microsoft-Windows-Subsystem-Linux
Your system may require a reboot after this.
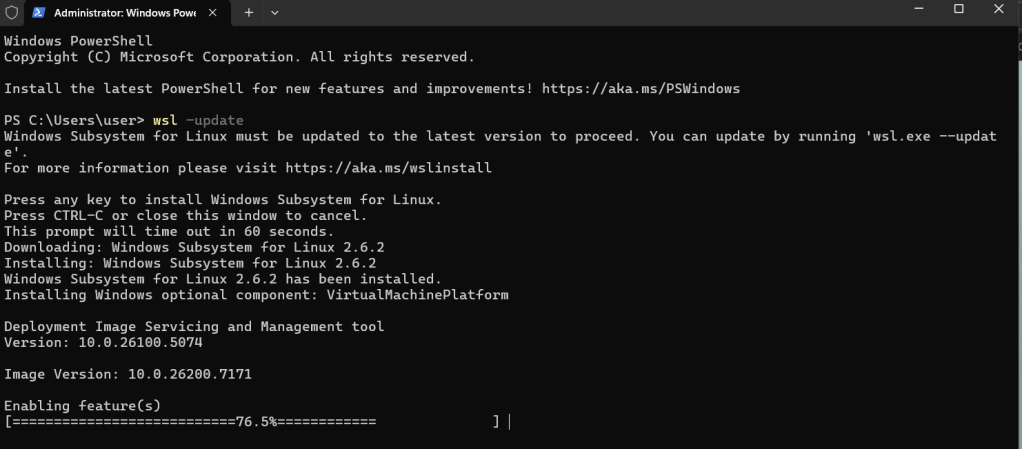
When you log back in, open PowerShell (again as Administrator) and run this command to apply any updates that are available.
wsl –update
While it is possible Windows will prompt you to reboot again, at this stage it is unlikely. However, if it does… just log back in, and then reopen Windows PowerShell as Administrator.
Step 2: Choose and Install Your Build
If you want to continue the PowerShell route, there is a simple way to extract a list of Linux builds available. Just type wsl –list –online. That will give you a list of builds (at the time of writing it was 22 distros) that can be installed by using the command wsl –install <distro name> -online. This list conveniently includes Kali Linux Rolling, which is the distro that I use most often. However, there are a number of other distros that are available through other means. While I will not spend any time discussing them, there are several additional builds that are available for download from the Microsoft Store, and a few others (including CentOS and RHEL) that are available to download as tarballs (.tar images) which can then be installed manually. In all there are more than thirty distros available, and while most of them are Debian based, there are a few available that are based on the Red Hat kernel.
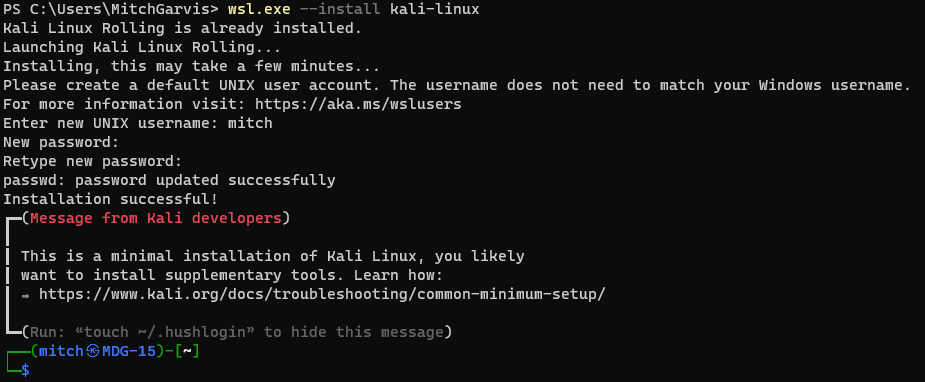
When you enter the command wsl –list –online you should receive a list that will include kali-linux. This is the one we are focusing on here, although I encourage you to install more than one!
wsl –install kali-linux
This will install a minimal Kali in your WSL. It might or might not require a reboot (I have seen both… for reasons I never quite understood). If it does, then reboot, and then reopen PowerShell. run the command wsl. You will be prompted to create a local user account. Remember that unlike Windows, Linux accounts are case-sensitive.
Step 3: Connecting to your WSL instance
Now that you have your Kali Linux instance installed, you have a number of easy ways to access it:
- From a command line you can type wsl.exe;
- In your Windows Terminal you should have an option to open a new tab directly into your WSL instance (note that if you just installed your WSL, this option will not be available until you close and then reopen Terminal); or
- In your Start Menu there will be an entry for kali-linux.

Note that to this point, you are exclusively accessing Linux from the bash. To get a GUI experience, read on to the next section (Installing Win-KeX).
Step 4: Install Win-KeX
Okay, we are not quite ready to interact with your Windows desktop. That requires another step. We are going to install Win-KeX in the Kali instance. Win-KeX is the tool that provides a full graphic desktop environment inside WSL, and it stands for Windows + Kali Desktop Experience.
In your WSL instance, run the following commands:
sudo apt update
sudo apt install -y kali-win-kex
We are now ready to go.
KeX supports three modes:
Windows Mode gives us a dedicated Kali desktop in a dedicated window. To start from inside your Kali WSL, type kex –win -s. To start it from PowerShell (or a Command Prompt) type wsl -d kali-linux kex –win -s
Seamless Mode allows us to share the Windows desktop between Windows and Kali applications and menus. To start from inside your Kali WSL, type kex –sl -s. To start it from PowerShell (or a Command Prompt) type wsl -d kali-linux kex –sl -s
Enhanced Session Mode is similar to Hyper-V, and uses Remote Desktop Protocol (RDP) for a more feature-rich experience. To start from inside your Kali WSL, type kex –esm –ip -s. To start it from PowerShell (or a Command Prompt) type wsl -d kali-linux kex –esm –ip -s
Step 5: Supersize Me!
I mentioned earlier that when you install Kali in WSL it installs a minimal installation. The minimal installation is good to get started, but you will not have all of the tools that make Kali the go-to for cybersecurity and penetration testing.
You can pick and choose which apps to install… but at that point you could just as easily be using Ubuntu. There is an option to install “Kali with everything” with a single command. From within your Kali WSL instance, type:
sudo apt update
sudo apt -y upgrade
sudo apt install -y kali-linux-large
You are now installing many different packages with a single command, and some of those packages require user interaction… even if it is just to click OK. Make sure you read what you are agreeing to… some of them might involve exposing or hiding your MAC address, and other fun stuff!
This will install all of the tools that you are used to having from a traditional Kali install… the full Monty, as it were. It will definitely take a few minutes, so be patient.
I should mention that this option is going to take a hit on your free drive space. Whereas the base install might be a couple of gigabytes in a virtual hard drive file, by installing Kali Linux Large that quickly turns into a file that is 30gb… before you do any work in it.
Step 6: Configuration
In addition to the WSL instance that you created, there is another new Start Menu item that might helpful. Windows Subsystem for Linux Settings allows you to manage the resources you are allowing the WSL instances to use, networking modes, optional features, and more. Take a look in them to see what you might want to tweak for your usage.
Conclusion
I have discovered a lot of bugs and instability in the current release of Windows Subsystem for Linux (version 2.6.2.0,kernel version 6.6.87.2-1, WSLg version 1.0.71, MSRDC version 1.2.6363). Don’t get me wrong; it works… more or less most of the time. It is definitely a useful tool, but these instabilities can test your patience. It is definitely not something I would recommend to hand to end users… but then again, most end users do not require Windows and Linux on the same interface. As an IT Pro / Techie, you will put up with having to reboot, or to terminate unresponsive processes, or other fun gotchas that you are likely to encounter.
Once you have gotten past all of the frustrations, you are likely to find that Kali on WSL is a great way to compromise using the familiar Windows 11 desktop while still having the powerful pen testing tools of Kali… without needing a second computer.
Good luck, and let me know how it goes for you!

Leave a comment