

In several presentations since Windows Server 2012 was released I have heard Microsofties claim that SAN devices are a thing of the past. I have a hard time getting on board with that, but have nonetheless told many an audience that if they are planning on throwing their SANs out because Microsoft said so then just let me know where they are doing it so I can come collect them.
That is not to say that Windows Server 2012 (and since 2012 R2) have not changed the storage game significantly. I have lectured extensively on Storage Pools (also known as Storage Spaces), and Cluster Shared Volumes are huge.
However since the world is going virtual, perhaps the most important storage use right now is the storage of virtual machines… and if I may borrow the motto of the Olympic Games, the order of this era of computing is “Citius, Atius, Fortius…” or Faster, Higher, Stronger. The storage on which we trust our virtual machines must be faster than ever, with higher availability than ever, and more resilient than ever. In short, we are trying to deliver perfection… just like an Olympian.
So how are we going to architect our Olympian storage solution for our virtual machines?
Scale-Out File Servers (SoFS).
SoFS is a redundant, Actove/Active clustered file server based on SMB (Server Message Block) 3.0. You aren’t going to build an SoFS cluster for your normal file servers – there are plenty of great technologies available for that, ranging from DFS-R to Clustered File Servers. Rather, SoFS is designed for high usage, always-open files, like virtual machines and SQL Servers.
Requirements:
If you are building this out in a lab you can get away with less, but in my experience you need a cluster that is separate from your Hyper-V cluster. I also prefer building my SoFS on physical hardware rather than on virtual, but this is negotiable.
To get started you have to make sure you have storage that can be added to a Failover Cluster. This can be done with Storage Pools, but I’ll do it with virtual disks.
Step 1: Build your Failover Cluster. I have already written about how to build a Failover Cluster. Follow Steps 1 & 2 in this article and you will be good to go. You can even go through the observational components of Step 3 that will verify quorum and things like that, but do not do the storage pars.
Step 2: Configure Storage.
This is the part that got me tripped up the first few times I tried to get it to work, and that was mostly because I didn’t RTFM. However in my defense, a lot of what tripped me up initially was not spelled out to clearly in the reading material.
In order for disks to be added to the cluster, they must be shared by all of the nodes of the cluster. If you are building a Software SAN on Windows Server 2012 R2 you can follow the instructions in this article. Finding the SAN LUNs from Windows Server just requires the iSCSI Initiator. Ensure that all nodes of your cluster are connected.
Incidentally having the shared storage may be enough to add it to your cluster, but in order to make this work the LUNs have to have a formatted partition on them. This was one of the gotchas I discovered along the way.
**VERY IMPORTANT NOTE: If your storage is ready to go when you create the cluster then you are fine, but remember that any time you make changes to your cluster you need to re-run the Validation Tests. As long as these tests are run and come back as ‘Suitable for Clustering’ then you are fine, but if they do not then Microsoft will not support you in your time of need.
So in Failover Cluster Manager if you expand <Cluster Name> – Storage – Disks you should see in the main window a list of all of your drives.
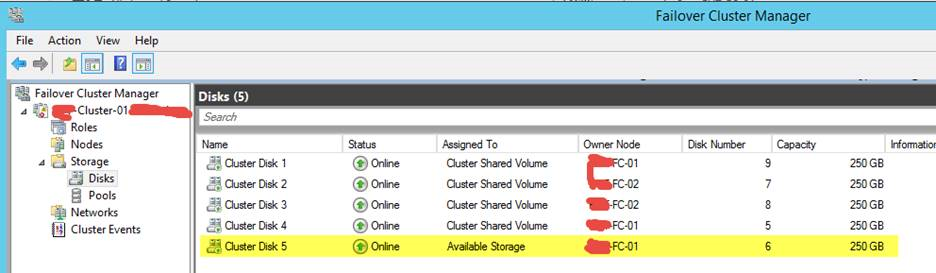
In this screenshot we see that the disk we want to use (Cluster Disk 5) is assigned to Available Storage. That is the disk we are going to use. Right-click on it, and click Add to Cluster Shared Volumes.
A Note about Cluster Shared Volumes (CSVs)
A Cluster Shared Volume is a pointer. It takes my LUN and puts it on my C Drive… okay, not really. However if I want to access my LUN from my server, I could refer to it as iqn.1991-05.com.microsoft:FS-fc-03-target-01-target:T0:L3, or I can assign it a drive letter.
The problem with assigning it a drive letter is that in a failover cluster there are multiple nodes that need to access the same LUN, and since drive letters are assigned by the server and not by the cluster, in order to ensure proper functionality I would have to ensure that each LUN had the same drive letter across all nodes in my cluster… which is simple, as long as the storage configuration (including hard drives & partitions, RAID arrays, CD/DVDs, and yes even USB keys) across all nodes in the cluster are identical. If not, then it’s a hassle.
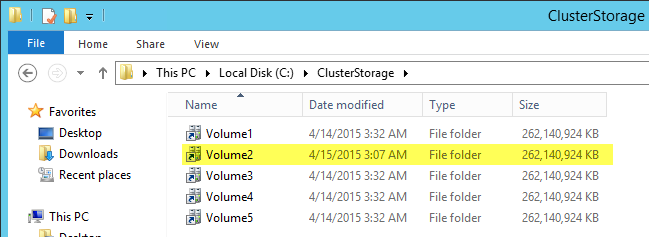
What CSVs do for me is takes the hassle out, and assigns a pointer to each LUN on my C drive… under c:\Cluster Storage\ each CSV will have its own directory, which is really a portal to my LUN. So the one we created in the previous step is called c:\Cluster Storage\Volume 2.
**IMPORTANT NOTE: While it may work, do not use your CSVs for anything other than Hyper-V and Failover Clusters. It will bite you eventually, and hard.
So now that I have my storage in place, let’s go ahead and build our Scale-Out File Server.
Step 3: Creating the Scale-Out File Server
SoFS is clustered role.
1. In the Navigation Pane of Failover Cluster Manager right-click Roles and click Configure Role…
2. In the Before You Begin page read the notes and click Next.
3. In the Select Role page select File Server and click Next.
4. In the File Server Type page click the radio Scale-Out File Server for application data and click Next. Note the warnings that SoFS does not support the NFS Protocol, DFS Replicastion, or File Server Resource Manager.
5. In the Client Access Point page type a name for your SoFS and click Next. Note that the name must be NetBIOS compliant.
6. On the Confirmation page ensure your information is correct and click Next
When you are done click Close and then navigate to Roles. You should see your role all ready.

Step 4: Creating a File Share
This is where all of the steps we went through before are important… you can only create a File Share for your SoFS on high availability storage.
1. Right-click on your SoFS role and click Add File Share. (If you get an error see this article, wait, then try again in a few minutes.
2. In the Select the profile for this share window select SMB Share – Applications and click Next.
3. In the Select the server and path for this share window select the your SoFS by name under the list of servers. Ensure the radio Select by volume is selected. Select the disk you want to create it on, and then click Next.
**NOTE: Notice that the volumes available are actually your CSVs, and that the File System listed is CSVFS.
4. In the Specify share name window type the name of your share, along with any notes you wish. Note that the remote path to the share will be \\SoFSName\ShareName. Click Next.
5. In the Configure Share settings window notice that several options are greyed out, including the Enable continuous availability option, which is forced. Your only choice here is whether to Encrypt data access, which you can do for security. Click Next.
6. In the Specify permissions to control access window you can modify the permissions, but remember that it is the Hyper-V hosts that will need access. Click Next.
7. On the Confirm selections page ensure your settings are correct, then click Create.
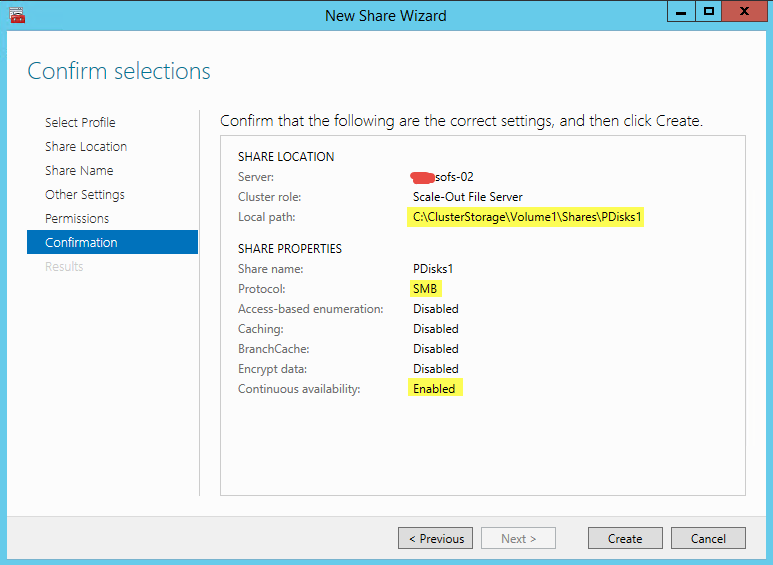
8. On the View results page ensure all steps are marked Completed, then click Close.
We’re done… Your Scale-Out File Server is ready to go. All you have to do is start migrating your VMs from where they were to (in this case) \\ServerName\PDisks. You can click on your role, and at the bottom of the screen select the Shares tab, and there it is… or in the case of this system, there they are, because yes, you can have multiple file shares on a single SoFS role.
Caveat Admin
Microsoft and Hyper-V, along with a lot of guidance from people like the author, have made virtualization available to anyone. With Failover Clusters they have made high availability easier than ever. However Icarus please remember that the solid foundation on which these tools are built depend on the integrity of your waxen wings; just because you are able to create something does not mean you have the knowledge of how to maintain it. If you don’t believe me, go ask any single mother with a dead-beat absent father. The fact that Windows Server 2012R2 makes these tasks so easy to do does not change the fact that this is still 400 level stuff, and proper education and certifications are always recommended before you bite off more than you can chew. All of the resources you need are available, you just have to look for them. Start at http://www.microsoftvirtualacademy.com, and go from there.

Leave a comment